
So You Want to Disarm That Owlbear Cave Trap in BG3?
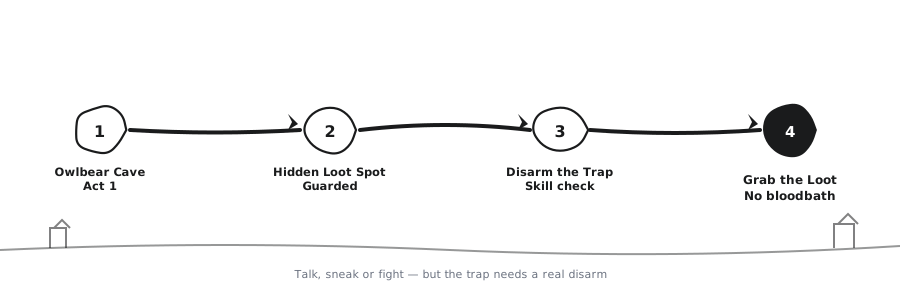
If you're trying to figure out how to disarm the trap in the owlbear cave in Baldur's Gate 3, you already know this isn't a simple "kill the monster, grab the loot" area. BG3 gives you choices. Talk your way through, sneak around, or fight. But the owlbear cave also has a hidden loot spot, and that spot is guarded by a trap.
Once you know how to disarm it, you can grab the loot without turning the whole den into a bloodbath. This walkthrough covers the trap location, the skill checks you need, and the safest route through the owlbear cave in Act 1.
Why the Owlbear Cave Trap Matters
The owlbear cave in BG3 is optional, but it's a good one. It has an adult owlbear, an owlbear cub, an owlbear egg, and some nice early loot if you explore carefully. The problem? Walk in blind and you'll either eat a full owlbear attack or trigger a trap that makes the fight much worse.
If you want to reach that hidden owlbear loot without pulling the whole cave, you need to deal with the trap first.
What You Need Before You Disarm the Trap in the Owlbear Cave
Before you even enter, get your party ready.
- One character with high Dexterity
- One character with Sleight of Hand proficiency
- At least one set of Thieves' Tools
- A reliable save point before you start
- A way to avoid the owlbear, like Speak with Animals for the peaceful route
Astarion is usually the best choice this early. If you're playing a Rogue, Bard, or Ranger, your own character can work too. The important thing is to use the party member with the highest trap-disarming bonus. Don't try to disarm the owlbear cave trap with a low-Dex character just because they're your main character. I learned that one the hard way.
Step-by-Step: How to Disarm the Trap in the Owlbear Cave
Here's the cleanest way to handle this area from start to finish.
Step 1: Save Before Entering
Trust me, save right outside the owlbear cave. This is an early-game area, but the owlbear hits hard. A failed trap check plus an angry owlbear can wipe a small party. A quick save gives you a clean do-over.
Step 2: Enter Slowly and Stay Crouched
When you enter the owlbear cave, stop moving as soon as you can see the owlbear. Crouch with the whole party before you walk into the middle of the room.
If the owlbear hasn't noticed you yet, you have some time to look around. This is when you want to spot the trap. If your party's Passive Perception is high enough, the game will show you a trap prompt. If you don't see it, move a little closer, but stay in stealth.
Step 3: Look for the Trap Near the Hidden Loot
The trap in the owlbear cave is placed around the hidden owlbear loot, not in the center of the cave floor. If you run straight toward the nest area, you'll likely trigger the owlbear before you even see the trap.
Move toward the side of the cave where the loot sits. If you see a glowing container or a suspicious ground area, stop.
In BG3, trapped objects usually show a small red or orange outline once someone in your party spots them. Not sure? Use a character with good Perception and slow down.
Step 4: Turn On Turn-Based Mode
Once you've spotted the trap, turn on Turn-Based Mode before you touch anything. This is the most important step.
Turn-Based Mode freezes the owlbear in place for a moment. That gives you time to disarm the trap without the owlbear walking over and interrupting. It also gives you a clear window to open the loot if the disarm works.
Step 5: Position Your Trap Specialist
Now send your high-Dex character toward the trap. Keep the rest of the party far enough back so they don't get caught in an explosion or trap trigger area.
Make sure that character has Thieves' Tools in their inventory. If you don't have Thieves' Tools, you can't disarm the trap. You can buy them from traders, find them, or pick them up from enemies. By Act 1, you should have at least one set if you've been exploring.
New player warning #1: If you see a "Trap Detected" prompt, stop walking. One more careless step can trigger it before you're ready. Turn on Turn-Based Mode immediately.
Step 6: Disarm the Trap
With the trap-detected prompt visible, interact with it. The game should give you a Disarm Trap option.
This is the skill check part. BG3 rolls a Disarm Trap check using your character's Dexterity, Sleight of Hand, and Thieves' Tools. If you have a high bonus, this will feel smooth. If you use a character with a poor bonus, the trap will likely trigger.
Step 7: Open the Hidden Loot After a Successful Disarm
Once the trap is gone, grab the hidden owlbear loot. You'll get the reward without the noise, and that makes it much easier to leave the cave without fighting the adult owlbear.
The best part? A successful trap disarm also gives you experience points. So you're not just saving yourself from damage—you're gaining XP for doing it right.
What Should You Do After You Disarm the Trap in the Owlbear Cave?
Now you have a choice.
If you're only here for the hidden owlbear loot, you can slip back out the way you came. As long as you don't attack the owlbear or grab the owlbear egg in front of it, the encounter can end peacefully.
If you want the owlbear egg, don't just run in and grab it. The adult owlbear reacts badly. With Speak with Animals, you can talk to the owlbear first, but stealing the egg will usually turn the cave hostile. Do that only if you're ready for a fight.
If you want the owlbear cub to show up later in the story, try not to kill it. Spare the cub, and it can play a role later in Act 1. Killing the mother is sometimes unavoidable, but the cub doesn't need to die.
New player warning #2: The owlbear egg isn't normal loot. Even if you've disarmed the trap, stealing the egg while the mother is alive can still turn the entire cave hostile.
Common Mistakes People Make in the Owlbear Cave
Here are the most common mistakes I see players make here.
Mistake 1: Trying to Disarm Without Thieves' Tools
You can't disarm traps in BG3 without Thieves' Tools. Some players run into the owlbear cave with only weapons and healing potions, then they're stuck. If the trap is still active, you either risk it or leave empty-handed.
Mistake 2: Using the Wrong Character
Strength and Constitution don't help with traps. Sending your heavy armor fighter to disarm the trap almost never works. Use your Rogue, Bard, or any Dexterity-based character with Sleight of Hand proficiency.
Mistake 3: Rushing Into the Cave
If you sprint into the owlbear cave, you'll skip all the quiet prep work and get attacked. This is a cave with a giant owlbear and a hidden trap. Rushing is the fastest way to trigger everything at once.
Mistake 4: Ignoring Turn-Based Mode
Turn-Based Mode isn't just for combat. It's also useful for trap disarming. If you stand next to a trap in real time, the owlbear may aggro at the worst possible moment. Turn-Based Mode lets you control the pace and gives you time to roll properly.
Mistake 5: Stealing the Egg Without a Plan
The owlbear egg is tempting, but it's not a normal piece of loot. If the mother owlbear is still alive, she will usually attack when you steal the egg. Even if you've disarmed the trap in the owlbear cave, the egg can still turn the area hostile.
New player warning #3: Save before you mess with the egg. Seriously. The mother owlbear doesn't care how well you disarmed her cave trap.
How to Handle the Owlbear Encounter If Everything Goes Wrong
Let's be honest: sometimes the owlbear fight just happens.
If the trap triggers, the owlbear gets aggressive, and you're stuck, don't panic. This fight is doable at level 3 or 4 if you use the cave layout.
- Spread your party out. The owlbear's melee attacks hurt, but it can't hit everyone at once if you stay separated.
- Keep the owlbear away from your trap specialist. Once the trap is disarmed, move that character to safety.
- Use ranged attacks if you have them. The owlbear cave has some higher ground. Use it.
- Protect characters with low hit points. The owlbear can knock a squishy character down fast.
- If the fight goes badly, retreat and come back after a Long Rest. You don't always need to finish the fight in one visit.
If you want the peaceful route instead, use Speak with Animals. Speak with Animals is a ritual spell in BG3, so cast it before you enter if you have access. Some characters can also use an Elixir of Animal Speaking. Talking with the owlbear gives you a chance to avoid violence and leaves the cave open for more careful exploration.
Owlbear Cave FAQ
Can every character disarm the trap in the owlbear cave?
No. The character needs Thieves' Tools in their inventory. High Dexterity, Sleight of Hand proficiency, and Thieves' Tools proficiency all make the roll much easier. A Bard or Rogue is usually the safest choice.
What happens if I fail the disarm check?
The trap triggers. Depending on the trap type, it deals damage to nearby characters and usually reveals your position. If you're in Turn-Based Mode, you may still be able to run away. If not, you may have to fight the owlbear.
Is the hidden loot in the owlbear cave worth it?
Yes, especially early in Act 1. The loot gives you extra supplies and sometimes a strong piece of gear. You also get XP for both spotting and disarming the trap, so it's worth doing properly.
Should I kill the owlbear or leave it alone?
If you don't need the owlbear egg, leaving the owlbear alive can set up a better story outcome. The owlbear cub can show up later, especially if it survives. If you're role-playing a monster hunter, you can still fight it, but expect a tougher fight.
The owlbear cave is one of those early Baldur's Gate 3 encounters that rewards patience. Walk in slow, spot the trap, and use the right character to disarm the trap in the owlbear cave. Do that, and the hidden loot is yours without turning the cave into an accidental boss fight.


