

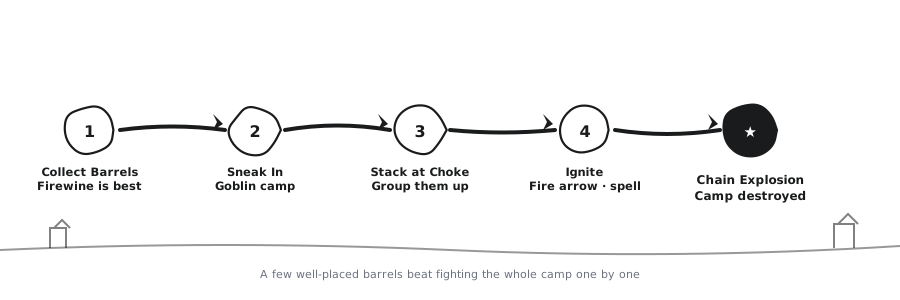
If you're stuck in Act 1, using barrelmancy to destroy the goblin camp is your loudest, dumbest, and most satisfying option. Don't chip away at every goblin one by one. A few well-placed firewine barrels turn the whole camp into a fireworks show.
Barrelmancy is just the Baldur's Gate 3 community's way of saying "use the environment as your weapon." The goblin camp is the perfect place to abuse it.
This guide walks you through exactly where to drop the barrels, how to chain the explosion, and how to avoid the dumb mistakes that turn your master plan into a party wipe.
Using Barrelmancy to Destroy the Goblin Camp: What You Need
Good news: you don't need a vault of rare explosives. You just need the right tools and a little patience.
Why Using Barrelmancy to Destroy the Goblin Camp Works So Well
The goblin camp is packed with low-health enemies who love standing shoulder to shoulder. Firewine barrels blow up when they take fire damage, and that blast can set off the next barrel. Once the chain starts, it usually doesn't stop until half the camp is ash.
Goblins also have a war drum problem. Start a fair fight and one goblin bolts for the drum, calling the entire camp down on you. Barrelmancy sidesteps that because you decide when the fight starts. One explosion can take out the drummers, the guards, and the courtyard group all at once.
What Barrels Do You Need?
Shopping list before you start placing explosives:
- Firewine barrels: Your main explosive fuel. Red, easy to spot, and all over the early game.
- Smokepowder barrels: Stronger than firewine, perfect for kicking off the chain. If you find one, save it for the middle of the camp.
- Oil jars or a small oil barrel: Oil fills gaps in your barrel chain. It also catches fire and keeps the chain alive when there's a small space between barrels.
You'll find firewine barrels around the Blighted Village, near goblin bonfires, and in the storage areas around the Shattered Sanctum. The game doesn't run a barrel shop, so grab every explosive barrel you see while you're out exploring Act 1. Hoard them.
What Skills Do You Need?
You only need one reliable way to set off the first barrel from range:
- Fire Bolt cantrip. Wyll, Gale, or a custom wizard works great.
- A bow with a fire arrow.
- Any explosion trigger like Alchemist's Fire, but a fire arrow is easier.
Don't use a melee torch unless you want to sprint into the blast radius. I did that once. My character ended up as goblin roast. Don't be me.
Step-by-Step Barrelmancy Setup at the Goblin Camp
When I first tried using barrelmancy to destroy the goblin camp, I figured it'd take hours of fiddling. After a few runs I realized it's just good setup and one clean trigger.
Step 1: Save Before You Set Up
Sounds obvious, but people forget. Barrelmancy is hilarious, but it's also unpredictable. Save right before you enter the camp area. If anything goes sideways, reload and try again without losing a companion.
Step 2: Switch to Turn-Based Mode
Turn-Based Mode is your best friend here. It freezes time, which lets you move barrels into place without goblins reacting in real time.
Here's the routine:
- Pause the game.
- Switch to Turn-Based Mode.
- Have one character carry the barrels.
- Walk slowly toward the camp.
- Place each barrel where you want it through the inventory menu.
Turn-Based Mode also keeps goblin patrols from shifting at the worst possible moment.
Step 3: Scout the Main Goblin Groups
Don't blow anything up yet. First, take a character with decent Stealth and creep around the edge of the camp. You're hunting for clusters of goblins near the main paths.
Usually they're hanging out in these spots:
- At the main walkway leading into the camp.
- Around the bonfire or courtyard area.
- Near the drummers, because drummers call extra reinforcements.
- Around the worg pens if you want to take out the wolves before they break loose.
Mark these spots in your head. Your goal is a barrel line that connects these groups.
Step 4: Build the Explosive Chain
This is where "one perfectly placed chain" comes alive.
Drop the first firewine barrel near the farthest group of goblins. Drop the second barrel a short distance away. Keep that distance tight. You want each barrel close enough that the blast from one triggers the next.
Gaps are your enemy. If there's a gap, drop an oil jar or a firewine puddle in the middle. Firewine spills when a barrel breaks, and that spilled alcohol carries the flame a few extra feet.
Example chain:
- Barrel 1: Near the group of goblins at the outer gate.
- Barrel 2: In the open space between that gate and the main courtyard.
- Barrel 3: Near the drummer.
- Barrel 4: Near the group that stands around the courtyard.
Sounds simple, but it works because each firewine barrel does chunky AoE damage and starts a new explosion.
Step 5: Get Everyone Into Position
Your party should be outside the blast radius. Climb to a safe spot. Stand on the bridge, up on the rocks, or just around the corner.
Don't stand in the middle of the camp next to the barrel you just placed. I beg you.
Take your Fire Bolt character and aim at the first barrel in the chain. The first shot hits the barrel, not a goblin. Once that barrel blows, the whole chain starts rolling.
You'll hear about half a dozen explosions in a few seconds. It's beautiful.
Step 6: Clean Up the Survivors
The explosion won't kill every goblin on the map. Some are too far away. Some goblin with high Constitution might hang on with a sliver of health.
That's fine.
After the fire dies down:
- Go back into Turn-Based Mode.
- Check the red dots on your mini-map.
- Kill the survivors before they reach a war drum.
- Focus the drummers first if they're still breathing.
- Loot the barrels that didn't explode, if any.
Done right, the goblin camp goes from a full war camp to a handful of panicking survivors. Weak ones, easy to mop up.
Step 7: Do It Again Inside the Shattered Sanctum
Same trick works inside the Shattered Sanctum for the main goblin leaders. You won't get one giant chain reaching from the courtyard all the way into the temple, because walls and doors block the explosion link.
Just repeat the core idea:
- Drop a firewine barrel near Priestess Gut.
- Drop another near Dror Ragzlin.
- Drop a barrel near Minthara's positioned guard group if you need to reset the fight.
You don't need as many barrels inside. One or two smokepowder barrels can take out a leader if they're close enough to the blast.
New Player Warnings Before You Go Barrel-Crazy
A few small warnings so you don't learn the hard way:
- Don't place barrels while a goblin patrol is staring at you. If you see suspicion, back off and wait before starting your setup.
- Don't crowd your whole party around the barrel line. Spread everyone out before you light the first one.
- Don't walk next to a fire source while carrying a firewine barrel. One unlucky spark turns your careful plan into your party's tombstone.
Common Barrelmancy Mistakes to Avoid
I've learned these the hard way. Avoid them and your goblin camp run goes way smoother.
Mistake 1: Trying to Place Barrels in the Middle of Combat
Once combat starts, goblins move around, attack, and break things. You can't calmly lay a chain when everyone's screaming and running. Set the barrels before any fighting begins.
Caught early? Just reload. It's faster than trying to salvage a bad barrel placement.
Mistake 2: Putting Barrels Too Far Apart
This is the number one reason chains fail. Firewine barrels need to be close to chain properly. Don't spread them across the whole camp like weird Christmas decorations.
Need to cover a big distance? Use oil jars. Oil ignites easy, and the fire from the oil sets off the next barrel.
Mistake 3: Standing Too Close to the First Barrel
There's always one person in the party who wants a better view. That person either gets knocked off a cliff or takes 30 fire damage. Let your party stand far away and just shoot the barrel.
You can still watch the chain reaction from a safe distance. Trust me.
Mistake 4: Forgetting Goblins Can Hit the Barrels
Regular goblins with arrows will sometimes shoot your barrels by accident. When that happens, you lose your plan and probably start combat early.
Use Hide or Crouch near the barrels. Stay out of the goblins' cone of vision when you're next to an explosive.
Mistake 5: Not Using the Puddle
Firewine spills when the barrel is destroyed. That spilled alcohol catches fire and lets the blast reach further. So if you're short on barrels, drop an oil jar or intentionally leave a small gap filled with a puddle.
The game never tells you "use the puddle," but the fire-spreading effect is real and you can use it to extend the chain.
Mistake 6: Killing Everyone by the Drum but Leaving the Drum
If the drum is still intact, a surviving goblin can run to it and call more reinforcements. The drum isn't the threat. The goblin hitting it is. After the explosion, check the drummers first.
Barrelmancy FAQ
What is barrelmancy in Baldur's Gate 3?
Barrelmancy is the art of using explosive barrels, oil jars, and other environmental hazards as your main source of damage. It's not an official game mechanic. It's just a player strategy that leans on the fact that anything flammable in BG3 can blow up and trigger a bigger chain reaction.
How many firewine barrels do you need to destroy the goblin camp?
You can get through the outer goblin camp with about four to six firewine barrels. A couple of smokepowder barrels speed things up, but they're not required. Fighting inside the Shattered Sanctum? Set aside one or two barrels for each leader room.
Does Barrelmancy kill the goblin leaders like Minthara and Ragzlin?
Yes, if you place the barrels correctly. Drop the barrel near them before combat starts or during the first turn. Leaders have more health than regular goblins, so use smokepowder barrels for the leaders and firewine barrels for the grunts.
Is barrelmancy worth it on a serious playthrough?
Absolutely. It's fast, saves resources, and keeps your party safe. You lose a little of the "fair fight" buzz, but you gain the memory of turning the goblin camp into a smoking crater. That's worth a lot.
Final Thought
Using barrelmancy to destroy the goblin camp in Baldur's Gate 3 isn't just a meme strategy. It's a practical way to handle one of the most annoying early-game zones. The goblin camp is full of enemies, war drums, and ambush spots. Barrels don't care about any of that. They just blow up.
So grab your firewine barrels, put your party on the high ground, and light the first one. The goblins will never see it coming.


