
If you need a no-nonsense Baldur’s Gate 3 All Bosses guide, you’re in the right place. This walkthrough covers the major boss fights from Act 1 to Act 3 with simple tactics, boss locations, and the loot that actually matters. I’ll keep it plain and practical: what to bring, what to hit first, and what not to do.
Baldur’s Gate 3 All Bosses: Act 1
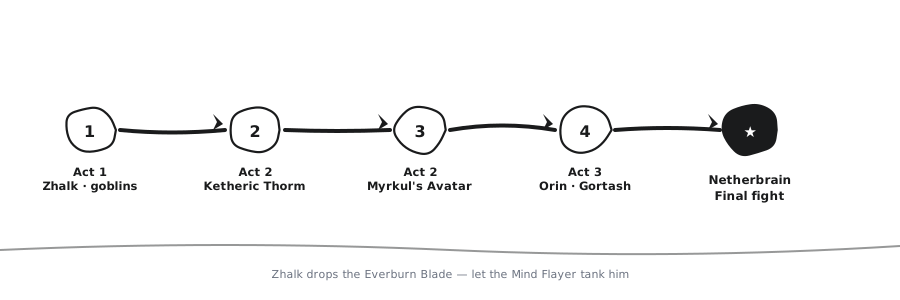
Commander Zhalk (Nautiloid)
Where: On the Nautiloid, right before the ship crashes.
This is the first optional boss you’ll see. He’s a cambion fighting a Mind Flayer, and he’s got the Everburn Blade. That sword is a great early weapon.
How to win:
- Let the Mind Flayer tank Zhalk. Don’t run into melee at level 1.
- Have Shadowheart cast Command: Drop to make Zhalk drop the Everburn Blade.
- Pick up the sword.
- Don’t risk your whole run for it. If the ship’s about to crash, move on.
Notable loot: Everburn Blade.
Goblin Camp Leaders: Priestess Gut, Dror Ragzlin, and Minthara
Where: The Goblin Camp / Shattered Sanctum.
These three are part of the “Kill the Goblin Leaders” quest. You don’t have to fight all of them at once. In fact, don’t.
Priestess Gut:
- Let her take you to her private room.
- Close the door behind you.
- Burst her down before she can call for help.
Dror Ragzlin:
- Clear the goblins on the rafters first.
- Then focus Ragzlin.
- Use ranged attacks and keep your casters at the back.
Minthara:
If you want to recruit Minthara later, use non-lethal melee damage and knock her out instead of killing her. Spells and ranged weapons won’t count as non-lethal, so don’t bother with those.
Notable loot: access to the goblin camp treasure room, plus whatever unique gear the leaders carry.
Auntie Ethel (Riverside Teahouse)
Where: The Sunlit Wetlands / Auntie Ethel’s lair.
Auntie Ethel is a hag, and this fight is all about dealing with her tricks. Use Magic Missile to clear her illusion copies quickly, and watch out for the traps in her lair. When she gets low, she’ll try to make a deal, so take it if you want the famous Auntie Ethel’s Hair.
Notable loot: Auntie Ethel’s Hair is the big reward here.
Phase Spider Matriarch and Grym
Where: Whispering Depths under the Blighted Village / Adamantine Forge.
These are optional Act 1 bosses, but they give good XP and some strong rewards. Let’s break them down.
Phase Spider Matriarch:
- Destroy the egg sacs in the area first.
- Don’t let the spiderlings swarm you.
- Use ranged damage because she teleports a lot.
Grym:
- Pull the lava valve to open the lava flow.
- Lure Grym into the center of the Adamantine Forge.
- Pull the overhead hammer lever to crush him.
When I first fought Grym, I tried to DPS him down with normal weapons. Big mistake. Use the hammer.
Notable loot: the Adamantine Forge lets you forge one Adamantine item after Grym dies.
Baldur’s Gate 3 All Bosses: Act 2
Thorm Family Side Bosses
Where: Reithwin Town.
You’ll run into three optional Thorm bosses: Thisobald Thorm at the Waning Moon, Malus Thorm at the House of Healing, and Gerringothe Thorm at the Tollhouse. You can sometimes talk them out of fighting, but if combat starts, use the same rule as always: clear the minions first. Don’t group up.
Balthazar and Yurgir (Gauntlet of Shar)
Where: The Gauntlet of Shar.
Balthazar:
He’s a necromancer, so he brings a lot of undead friends. Focus Balthazar fast. Bring Counterspell if you have it, because his magic is nasty.
Yurgir:
Yurgir is an Orthon devil, and you don’t have to fight him. Try talking first—you can solve his contract without a bloodbath. If you do fight, keep your party spread out and don’t let him get close to your squishy characters.
Ketheric Thorm (Moonrise Towers)
Where: The top of Moonrise Towers.
This is the main Act 2 boss, and it’s a long fight with two phases.
New player warning: save before this fight. You don’t want to redo the whole tower just because you got greedy.
How to win:
- Save before this fight.
- In phase 1, clear the necromite adds fast. They’ll pile up if you ignore them.
- If you freed Dame Aylin, let her draw some of the aggro.
- In phase 2, Ketheric transforms into the Apostle of Myrkul.
- Use radiant damage against the undead.
- Keep your party spread out so the Apostle’s big attacks don’t hit everyone at once.
Notable loot: Ketheric’s Netherstone, which you need for the main story.
Baldur’s Gate 3 All Bosses: Act 3
Orin the Red
Where: Temple of Bhaal.
Orin is a duelist, and her fight has one big gimmick: Unstoppable.
How to win:
- Bring Magic Missile.
- Use multi-hit attacks to strip Orin’s Unstoppable stacks.
- Once the stacks are gone, hit her with your big damage.
- When she transforms into the Slayer, expect heavy melee damage.
Notable loot: Orin’s Netherstone and her unique dagger.
Cazador Szarr
Where: Szarr Palace.
Cazador is the vampire lord in Astarion’s personal quest. If Astarion is in your party, this fight matters a lot.
How to win:
- Keep Astarion safe. Cazador wants him for the ritual.
- Use radiant damage. Vampires hate it.
- Clear any vampire spawn minions before you focus too hard on Cazador.
- Don’t let your party bunch up in the ritual area.
Raphael
Where: House of Hope.
Raphael is one of the hardest optional bosses in the game. He’s a devil with a lot of fire power.
How to win:
- Destroy the Soul Pillars first. Raphael gets stronger while they’re up.
- Drink fire resistance potions before the fight.
- Keep your party spread out.
- Use any healers or support NPCs you saved, like Hope.
Notable loot: Helldusk Armor.
Ansur
Where: The Wyrmway under Baldur’s Gate.
Ansur is an undead dragon. He hits hard and uses a lot of lightning damage.
How to win:
- Bring lightning resistance.
- Bring healers.
- Don’t waste your biggest nukes while he is still charging his nova attack.
- Stay mobile and top your party off.
Notable loot: Balduran’s Giantslayer.
Gortash and the Netherbrain
Where: Wyrm’s Rock and the final upper city fight.
Gortash:
- Destroy the Steel Watch Foundry before you fight Gortash if you can.
- That stops the Steel Watch from helping him.
- Once you’re in the room, focus Gortash and keep moving.
Netherbrain:
- Use the special ally actions you unlocked from side quests.
- Target the brain and don’t stop attacking.
- Let your summons and allies take the hits.
Notable loot: Gortash’s Netherstone, then the ending.
Other Act 3 bosses worth doing include Sarevok, Viconia DeVir, Lorroakan, and Mystic Carrion. They’re all optional, but they drop some of the best gear for the final battle.
Common Mistakes in Boss Fights
New player warning: if you see a red skull over a boss, that’s the game telling you to come back later. Don’t brute-force it.
1. Not using Examine.
Right-click the boss and hit Examine before you fight. You’ll see resistances, immunities, and legendary actions.
2. Focusing the boss while adds are still alive.
Most BG3 boss fights have adds that make things worse. Clear them first.
3. Grouping up too much.
Big enemy AoE attacks will wreck a tight party. Spread out whenever you can.
4. Hoarding consumables.
New player warning: don’t do this. If you have an elixir, scroll, or potion that can save you, use it. You don’t get bonus points for saving all your best items for later.
Frequently Asked Questions
What order should I fight bosses in Baldur’s Gate 3?
There’s no single order. A safe pace is Act 1 around level 5–7, Act 2 around level 7–9, and Act 3 around level 10–12. If a boss shows a red skull, leave and gain some XP first.
Do I need to kill every optional boss in Baldur’s Gate 3?
No. Optional bosses like Zhalk, Grym, Ansur, and Raphael are not required. You only need Ketheric, Orin, and Gortash for the main Netherstone quest.
Can I spare Minthara?
Yes. Use non-lethal melee damage to knock her out, and she can show up later. Spells and ranged attacks will usually kill her instead.
What’s the hardest boss in BG3?
Most players say Raphael or the final Netherbrain. Ansur can also be rough if you go in without lightning protection.


